
Peri- and para-implant composite restorations
In most cases, direct composite restorations alone are the focus of attention. However, there are many indications in which small, complementary composite restorations on an implant crown or its adjacent teeth can significantly improve the overall optical appearance and thus become decorative accessories: Small but nice! The focus here is primarily on aesthetic improvements to the overall appearance; in addition, this leads to an optimised distance between the limbus alveolaris and the proximal contact. This can lead to more stable gingival and periodontal conditions. The following article will present some cases. Perhaps this will give rise to ideas for small, complementary peri- and paraprosthetic measures in your own patients.
The aesthetic and rehabilitative possibilities of direct composite restorations are well known and acknowledged [2, 4, 10, 14, 15, 18, 19]. If a few essential principles are followed [5, 17], aesthetic, functional and durable minimally invasive restorations can be created from them, which can usually stand comparison with veneer restorations [3, 6, 12]. Numerous treatment options are available for the treatment of approximal-cervical defects [38]. In most cases, veneers [12, 24] compete with direct composite restorations; hyaluronic acid injections [38] may well be mentioned in this context, but they are based on an entirely different treatment philosophy. For those who enjoy composite restorations, the direct adhesive form of restoration opens up an immensely wide range of therapeutic possibilities [28]. For the patient, the direct composite restoration is the most minimally invasive and also the most cost-effective restoration for closing black triangles or approximalcervical defects, as corresponding case publications show [13, 28]. The „aesthetic challenge“ [38] in the application of direct composite restorations consists primarily in the design of the shape, whereas the shade selection is conceivably simple: since neither large-volume dentin areas have to be built up nor translucent incisal edge effects have to be represented via enamel materials, very beautiful aesthetic results can be achieved with simplified shade systems or the selective choice of certain universal shades of more comprehensive systems. [13, 20, 22]. Colour systems that follow the principle of „one colour fits all“ can also exploit their potential almost to the full here: Indeed, less is often more here. The case reports shown here (2x tooth 21, 2x tooth 12 in different initial constellations) illustrate the aesthetic possibilities of supporting adhesive-restorative measures in implantological/periodontological subjects.
Case 1: Basal widening of an existing implant crown.
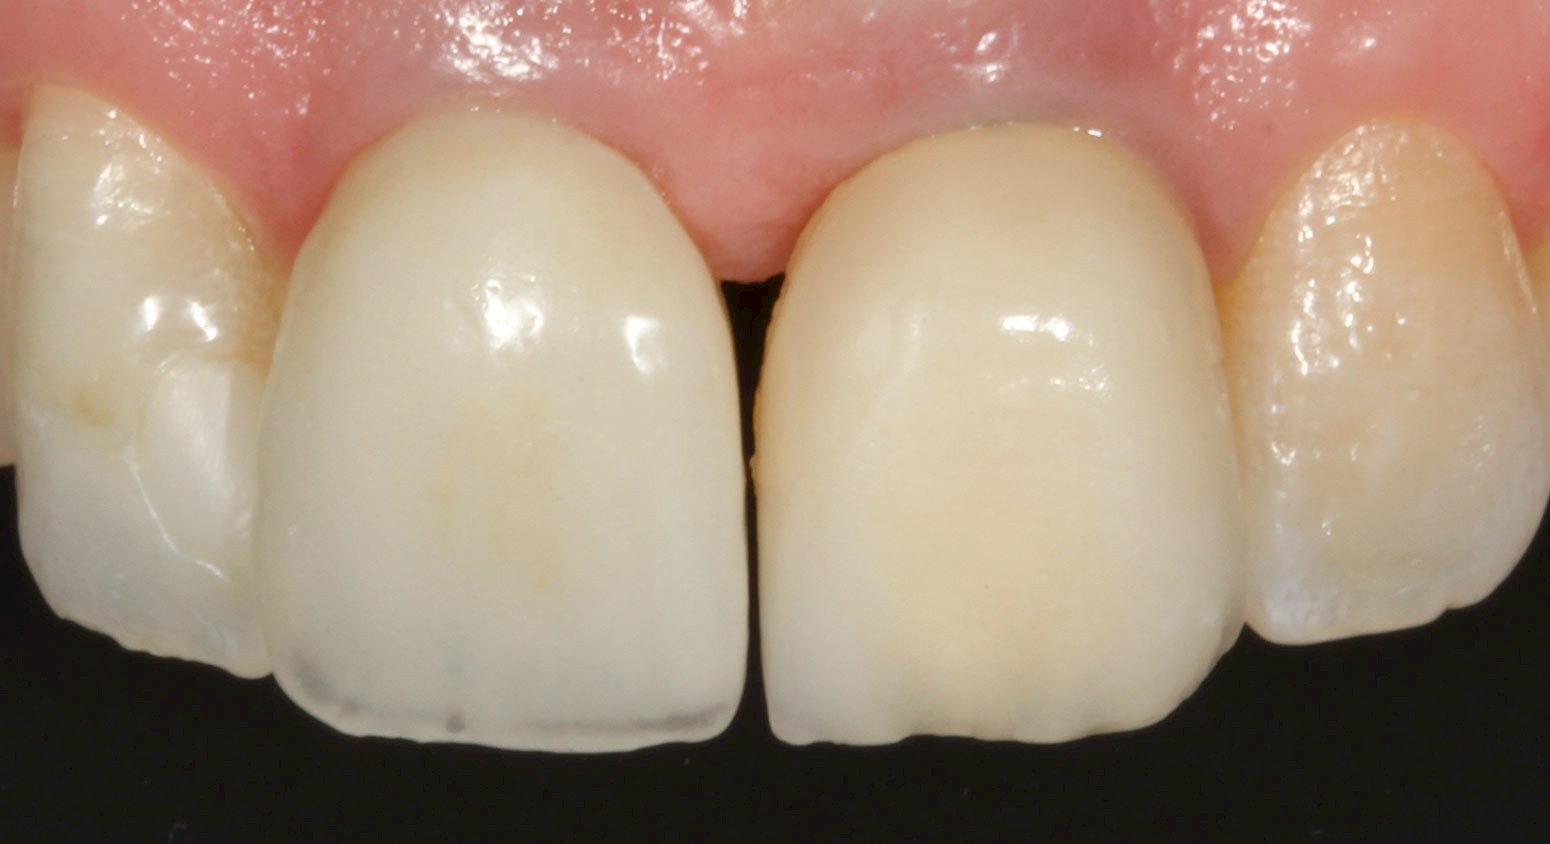
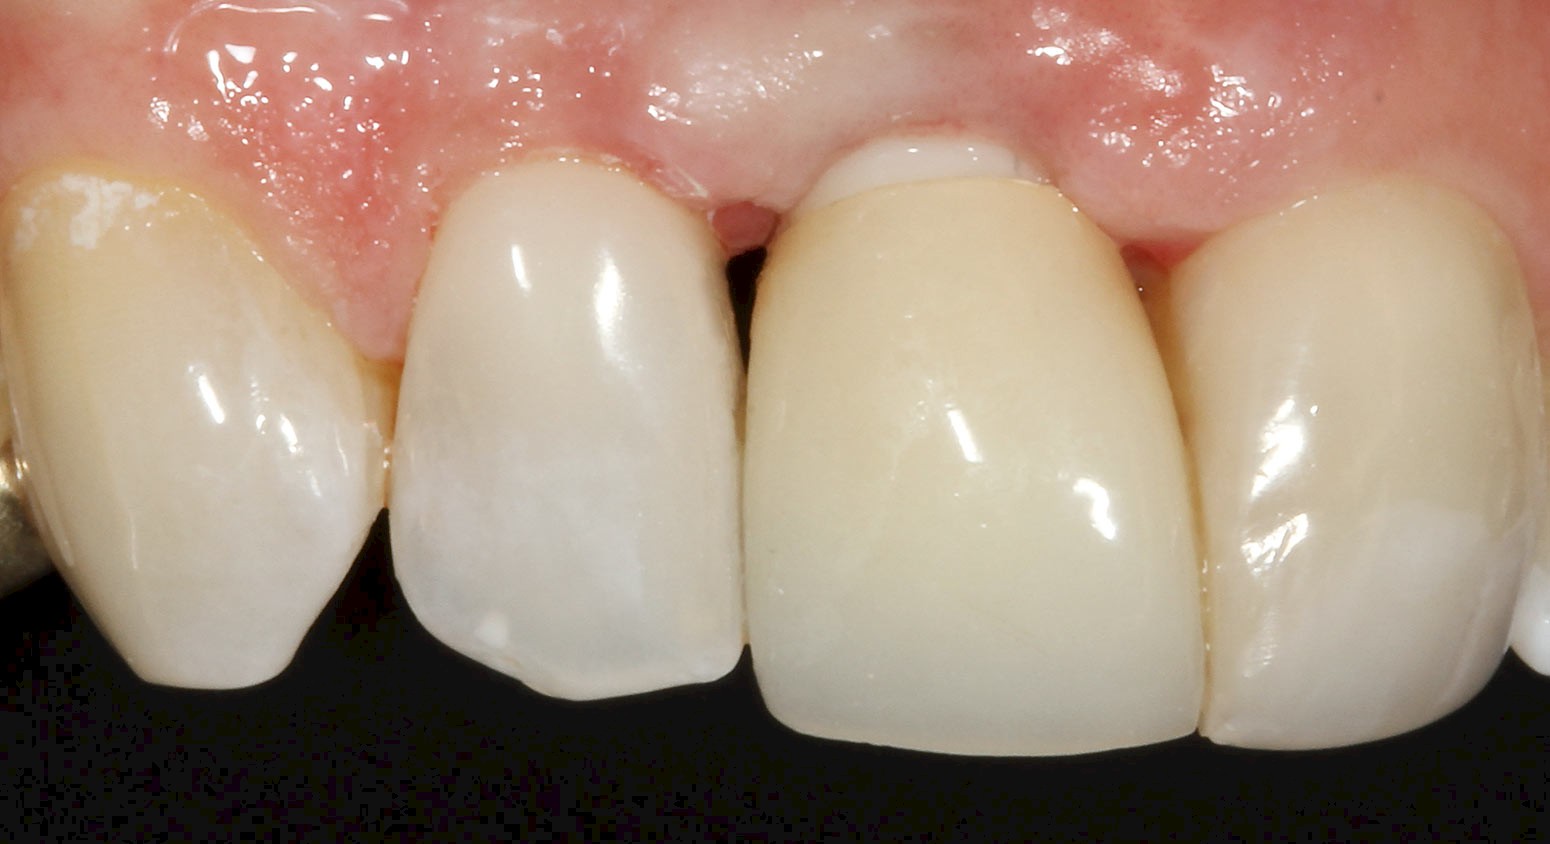
The 49-year-old patient is currently undergoing implant prosthetic restoration of tooth 11. Tooth 11 wears a temporary PMMA crown. Tooth 21 had already been restored with an implant prosthesis years earlier; it wears a veneered zirconium oxide crown. During the planning of the definitive crown restoration of tooth 11, the following problem was apparent: If the shape of the new crown on implant 11 was designed as a mirror image of the existing implant crown in region 21, a very pronounced black triangle would be created interradicularly. If, on the other hand, the implant crown 11 is designed somewhat more bulbous, a somewhat reduced black triangle would be created unilaterally, but a very conspicuous asymmetry of the two implant crowns would have to be accepted. A renewal of implant crown 21 was ruled out for the patient for cost reasons.
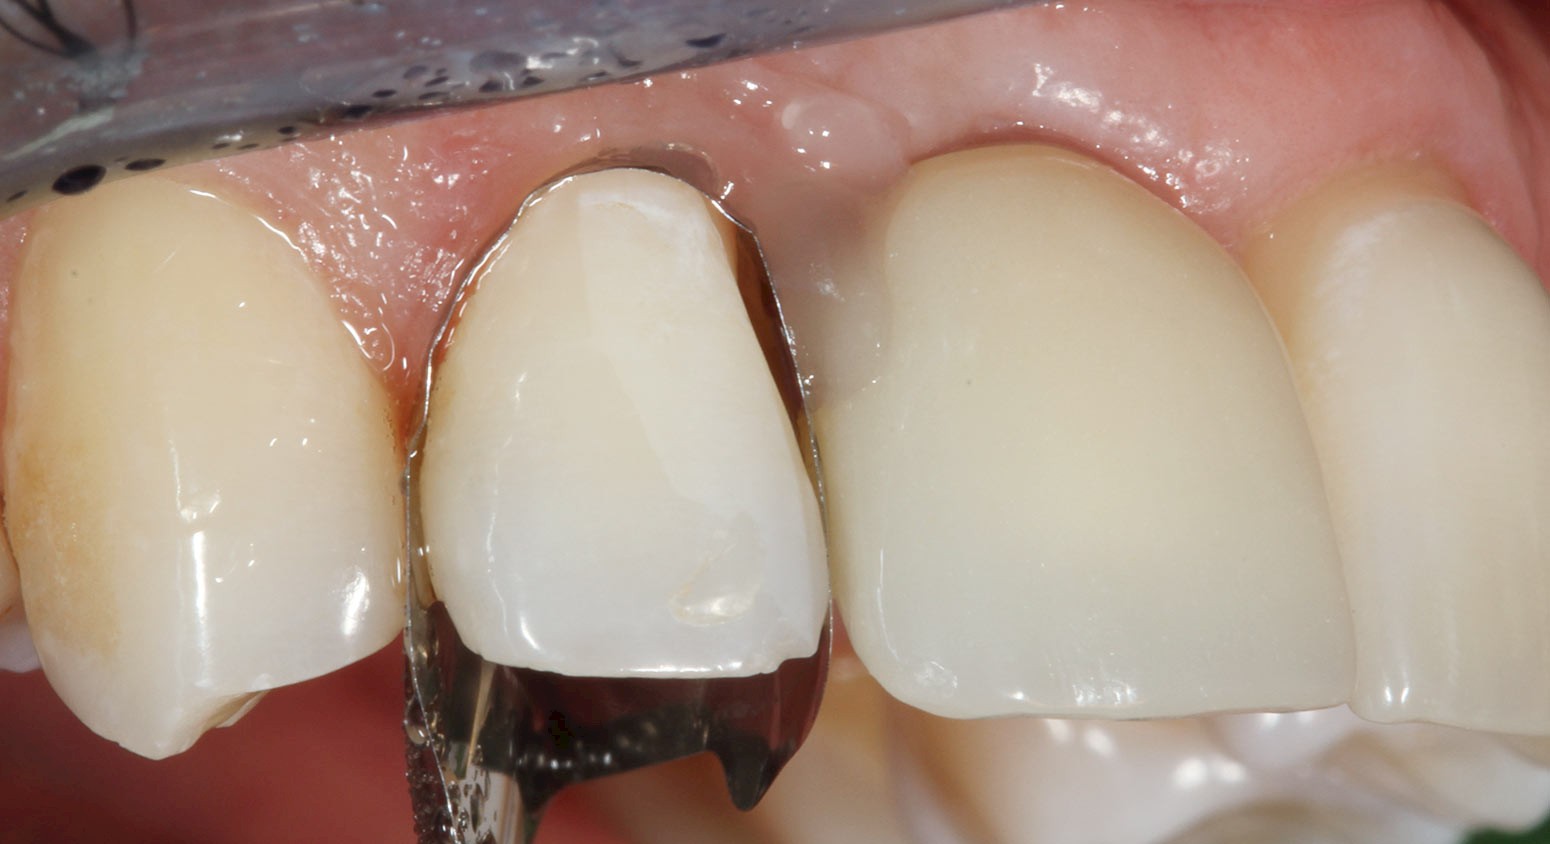
For this reason, it was suggested to the patient to leave crown 21 in situ, but to widen it basally/ cervically with a circular composite attachment. The patient liked the idea of achieving an aesthetic match of the two implant crowns in this way without having to factor in too high additional costs. Figure 1 shows the clinical situation already under isolation of the anterior segment of tooth 14-24 with a rubber dam (extra-heavy). The extra-heavy cofferdam allows a very good, tight inversion to secure the gingiva before the blasting of the adhesive surface required in the next working step. Regarding the pre-treatment of the veneered zirconia crown, it was problematic to clearly identify the transition to the veneer. Zirconia is best blasted with 50 m 5 aluminium oxide at 1-2 bar, glass-based ceramics (this would be the veneering ceramic in this case) are best etched with hydrofluoric acid. [1, 8, 9, 23, 26, 29]. A metaanalysis from 2015 confirms this [31]. However, intraoral hydrofluoric acid etching is prohibited here for safety reasons. Since tribochemical silicatisation on the one hand provides better bonding values on zirconium oxide than blasting with aluminium oxide alone [7, 27] and on the other hand also works very well on glass-based ceramics, especially for intraoral repair, the choice in the present case was made to pre-treat the entire bonding surface with CoJet (3M). Figure 2 shows the basal part of implant crown 21 blasted with CoJet.
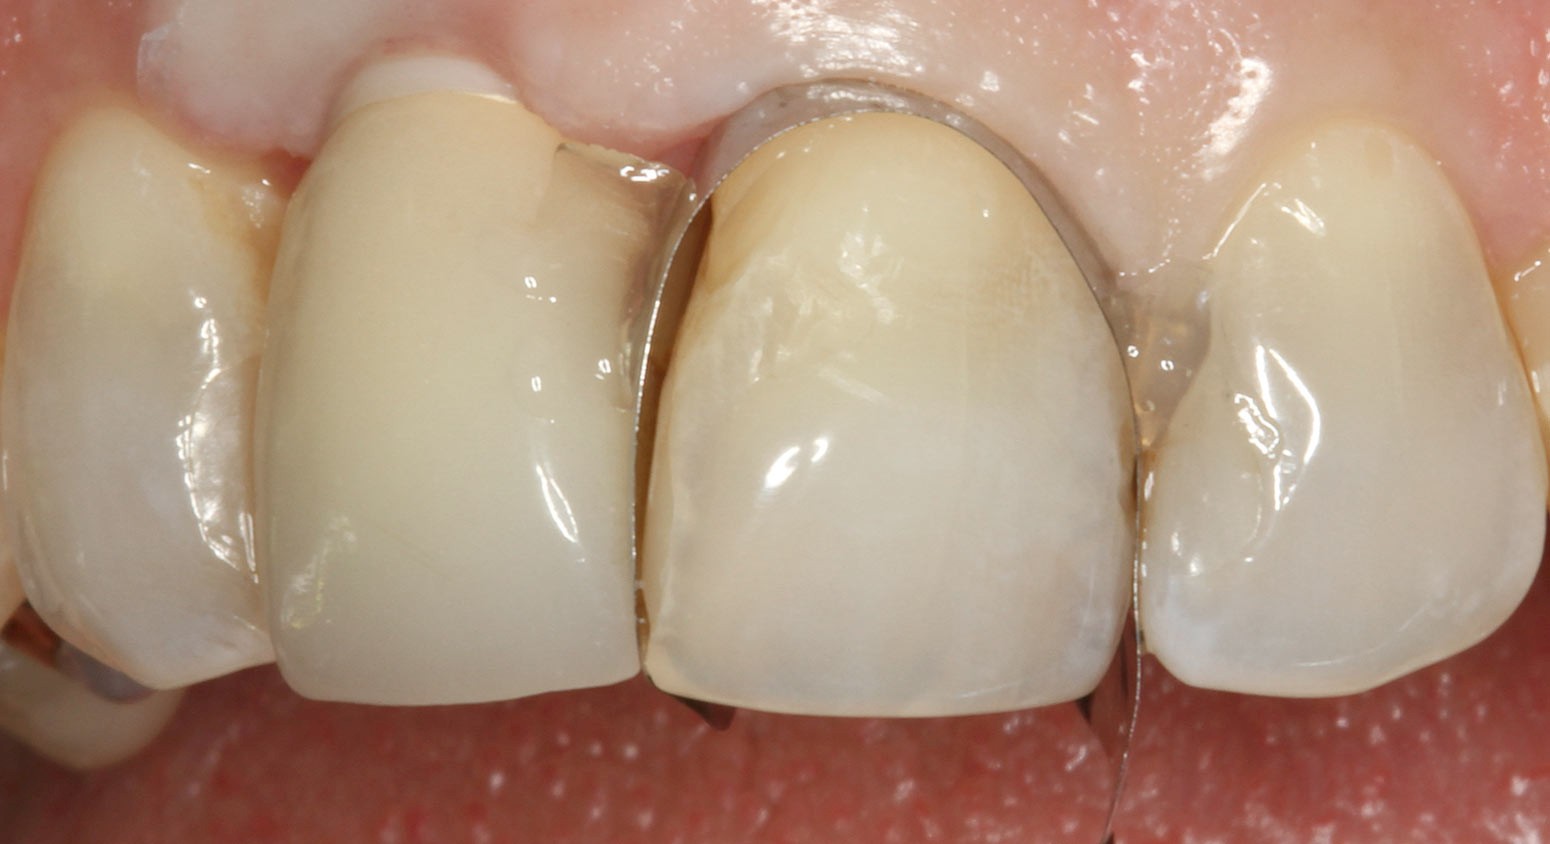
For shaping, the cervical area of the crown had to be shuttered. The Unica matrix from Polydentia, which has already served very well several times [21, 22], was ideal for this purpose. Figure 3 shows the matrix placed and fixed with a light-curing, rubber-elastic temporary material (Clip Flow, VOCO).For further pre-treatment of the blasted zirconium oxide or veneering ceramic surface, the following four scenarios are possible:
- universal ceramic primer + classic type I or II adhesive
- universal ceramic primer + universal adhesive
- only universal adhesive
- 2-component universal adhesive specially developed for the pretreatment of indirect restorations
While variants 1 and 2 can be considered equivalent and are rather subject to personal preferences (adhesion will be sufficient in any case, as long as a silane resp. (adhesion will be sufficient in any case as long as a silane or ceramic primer containing MDP/silane is applied in advance), variant 3 is not recommended, as the silane added to a one-component universal adhesive is not storage-stable in the acidic environment of the universal adhesive: contrary to the manufacturer‘s claims, many independent publications in peer-reviewed journals show that after loading scenarios, no sufficient adhesive bond to etched glass-ceramic surfaces could be documented [11, 26, 30, 33, 34, 39, 40]. However, if a silane or universal primer [16, 25, 36] is applied freshly beforehand, the procedure works.
Alternatively, one can play it safe and use a 2-component universal adhesive (Vaiante 4): In this case, the required silane can be integrated in the non-acidic component in a storage-stable manner, whereas it quickly decomposes in 1-component universal adhesives due to the inherent low pH value of the materials. In the present case, this is exactly how it was done: In contrast to other 2-component universal adhesives on the market, the development of the TOKUYAMA UNIVERSAL BOND used here (now on the market as the revised version TOKUYAMA UNIVERSAL BOND II) placed primary emphasis on the quality of the adhesive bond to indirect restorative materials. Since this was precisely the focus of the requirement here, this universal adhesive was used after blasting with CoJet: The two components were mixed, applied and immediately blasted. A reaction time is not necessary, even counterproductive, as the material is self-curing and a waiting or reaction time would already start the self-curing process without the solvent being able to evaporate sufficiently.
Ceram.X Spectra ST HV (Dentsply Sirona) in shade A3 was used as the composite material. To ensure that the acute angles between the matrix and the crown were filled, a flowable (Filtek Supreme XTE Flow A3) was placed there beforehand and not polymerised. This procedure corresponds to the „snow plough technique“ in which the flowable is pressed into the acute angles by the pressure of a subsequently applied, paste-like composite material (Fig. 4). This ensures a tight and bubble-free adaptation. This technique was described by Opdam et al. in 2003 for Class I cavities [32], and was later taken up by the Heidelberg Department of Dental Conservation for the anterior region, where it was also established [37].
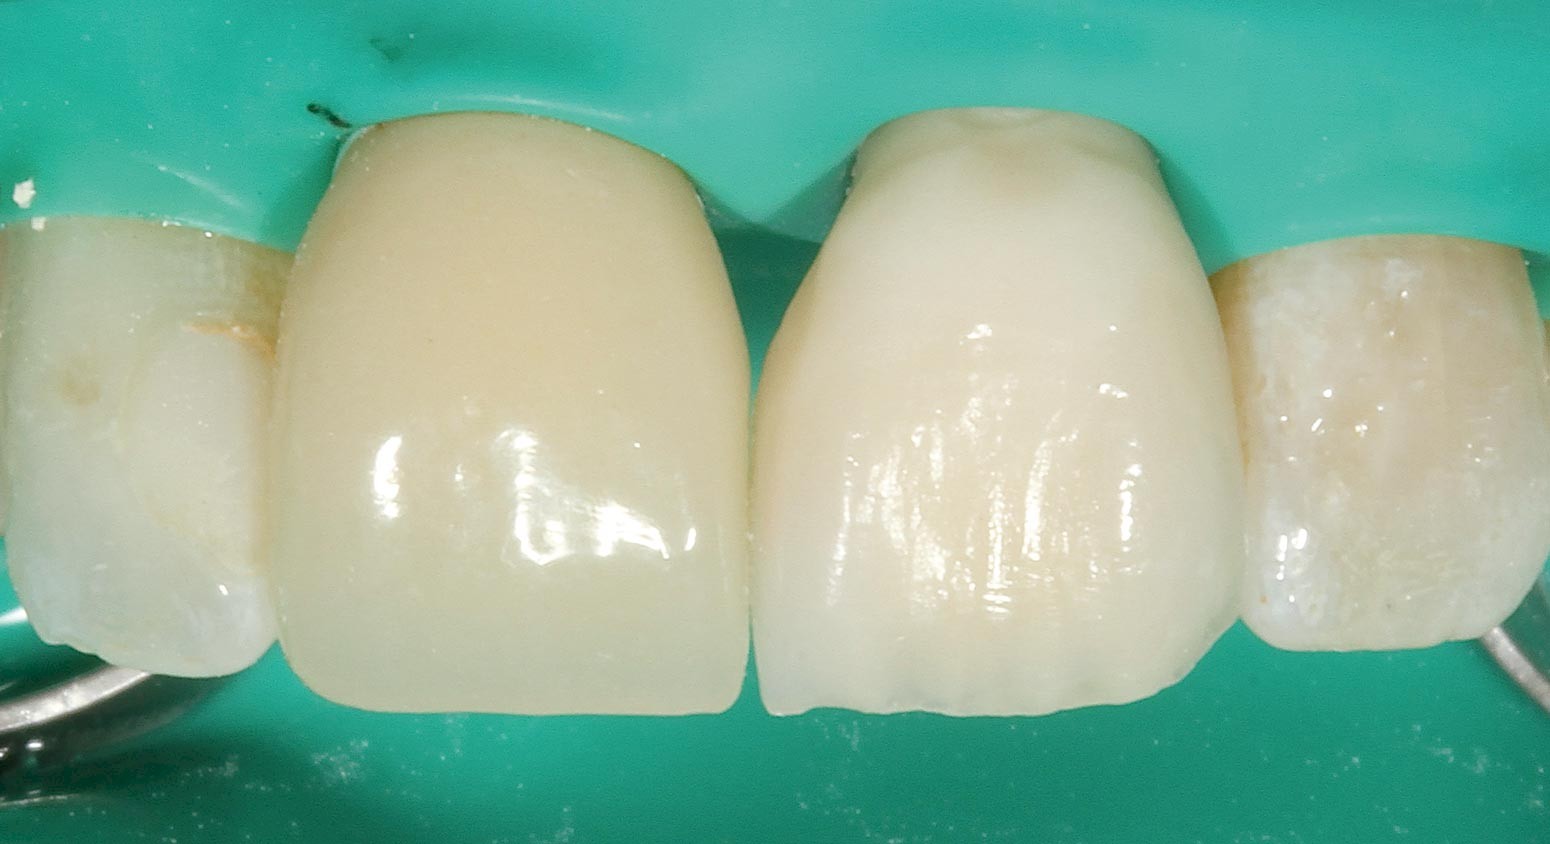
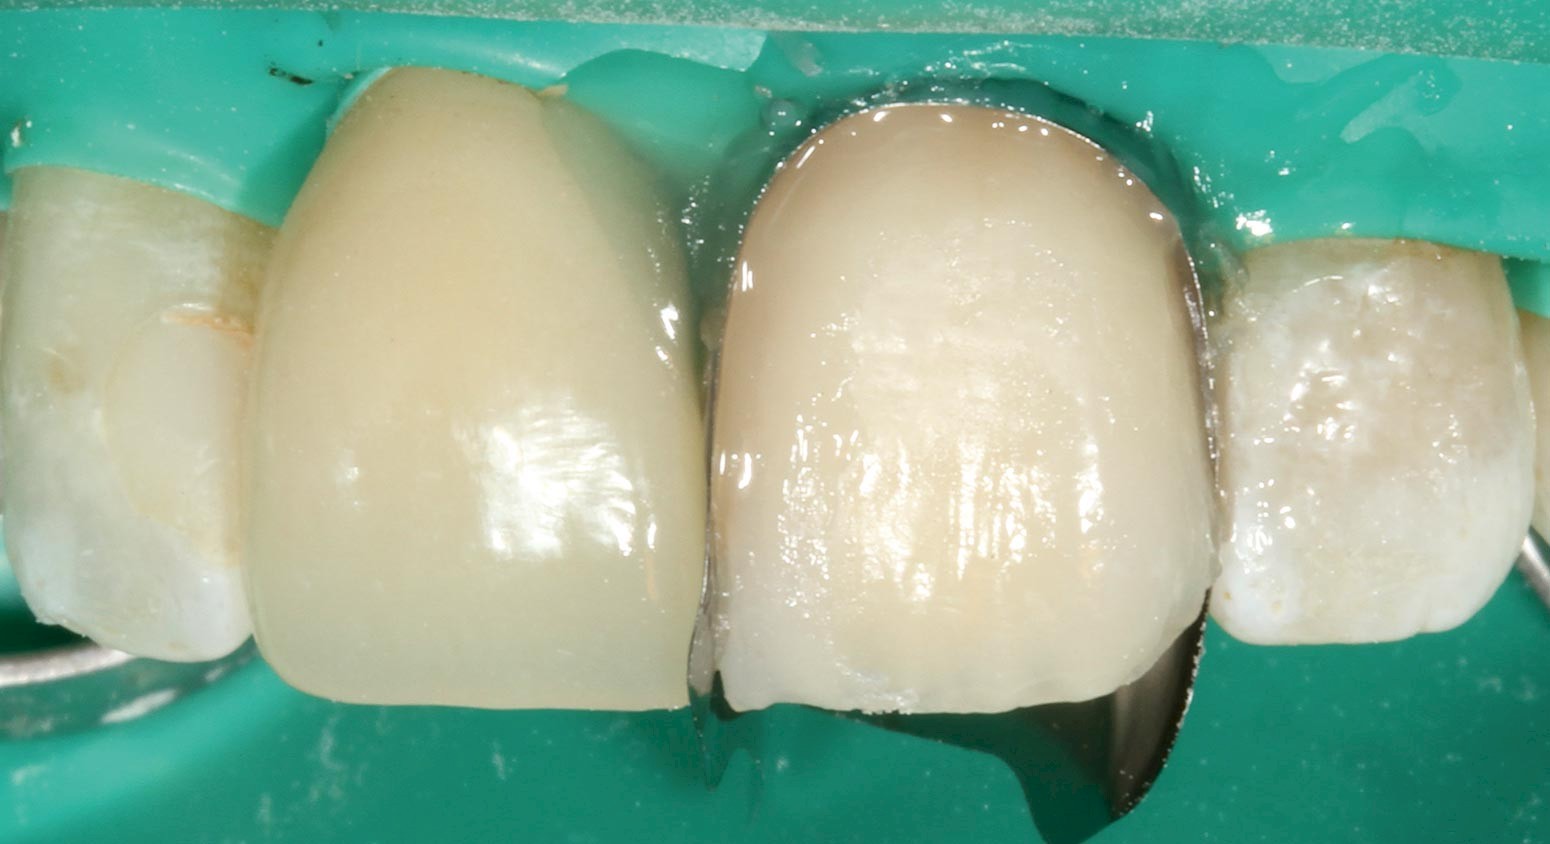
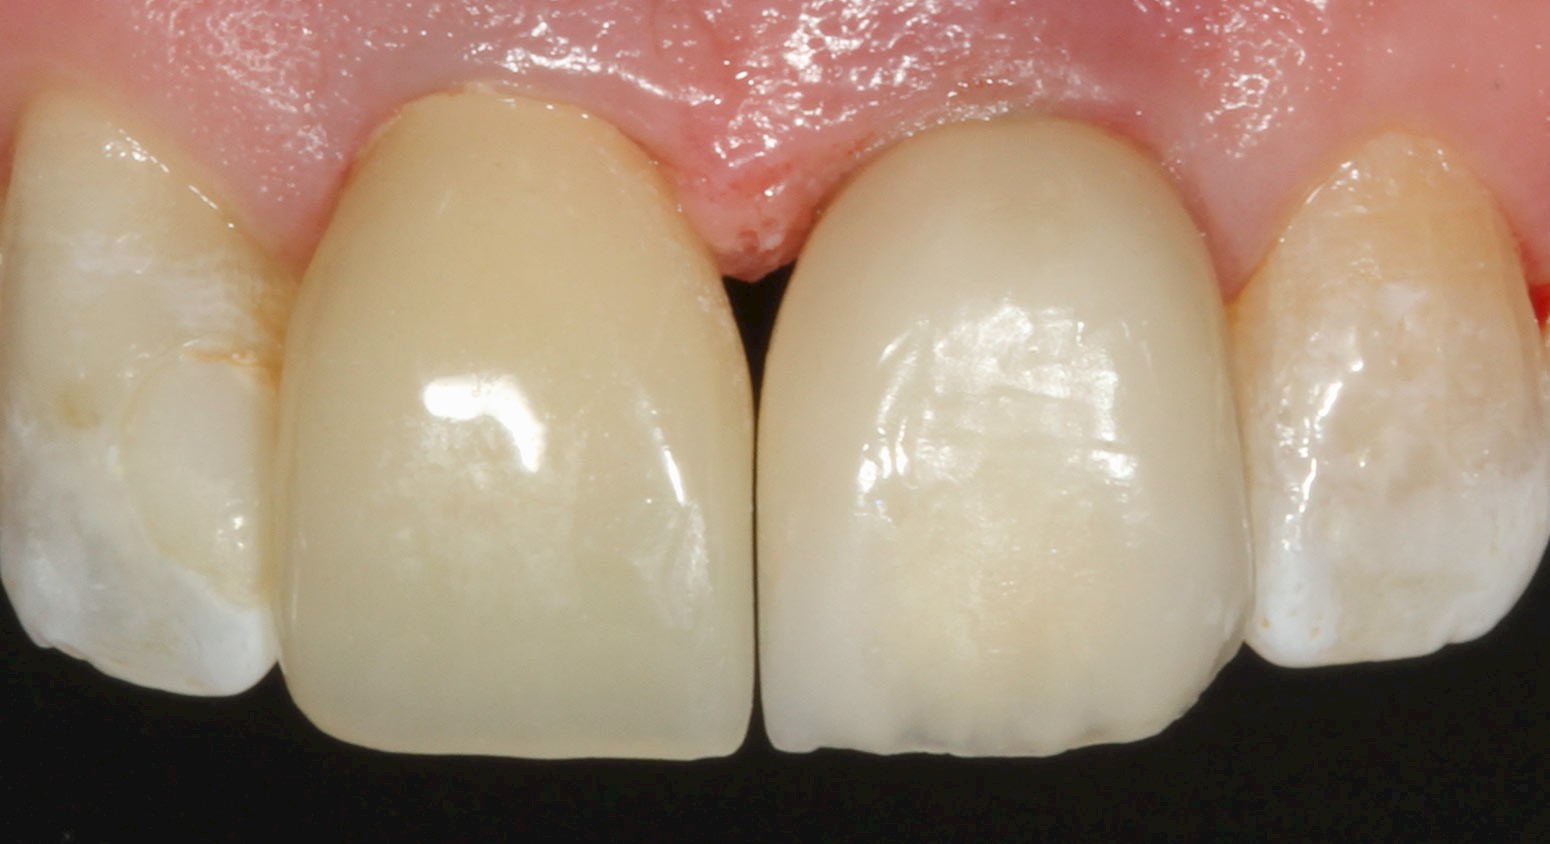
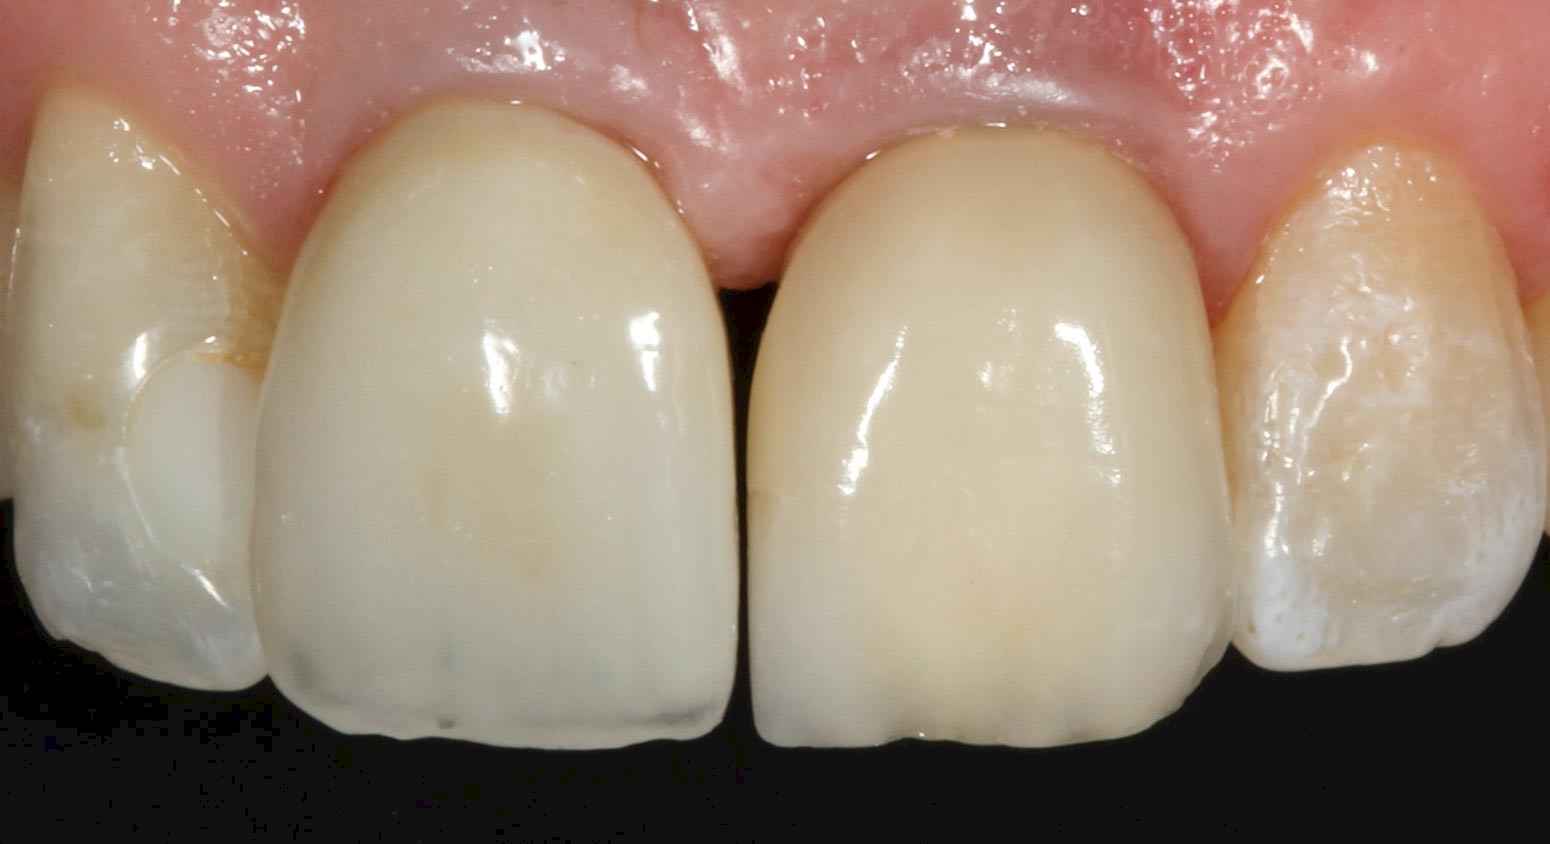
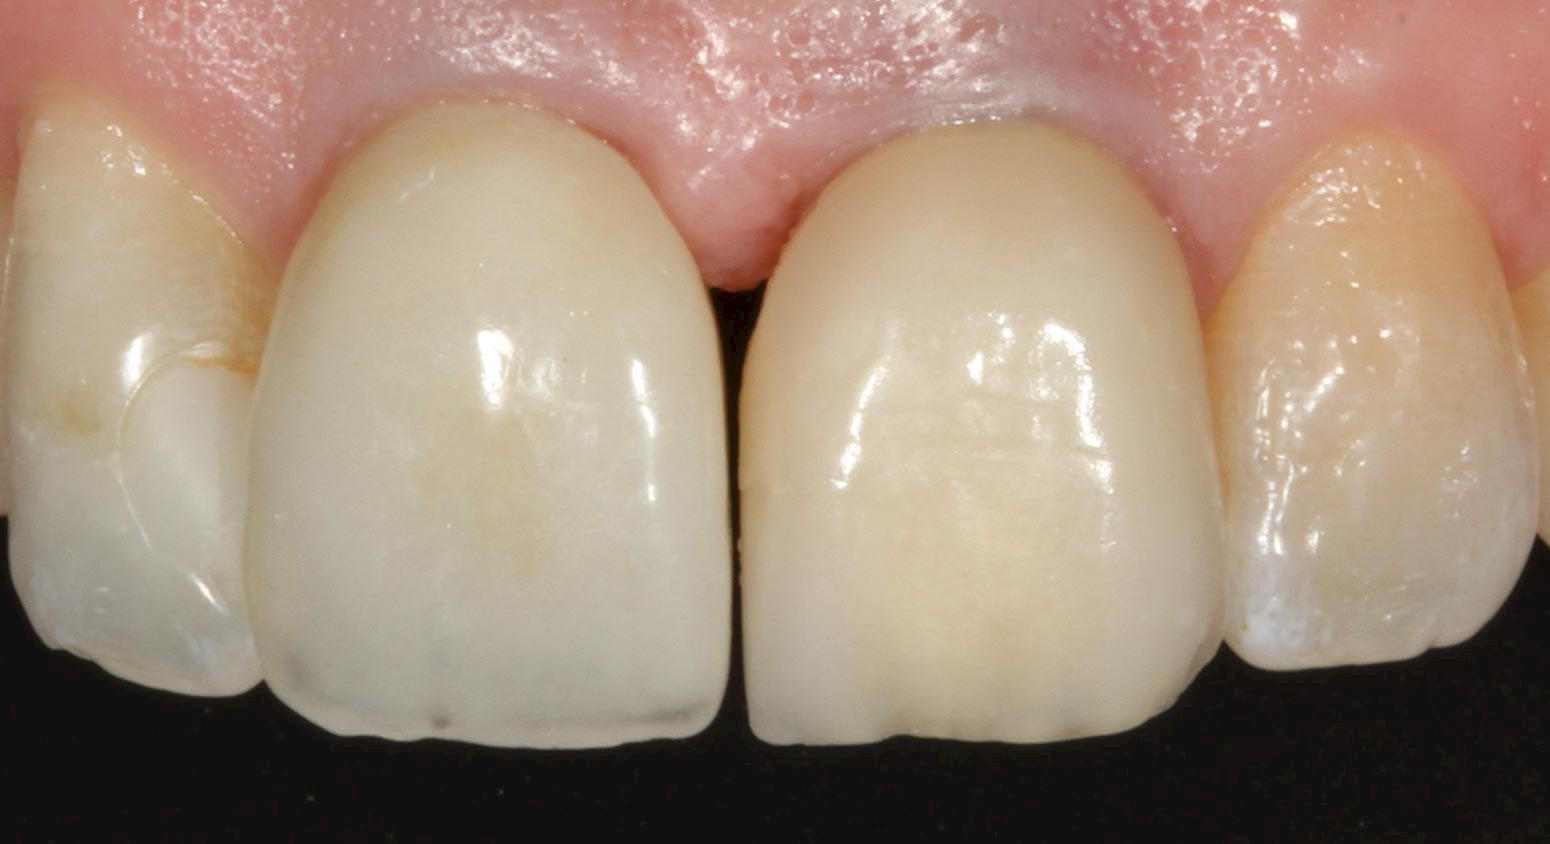
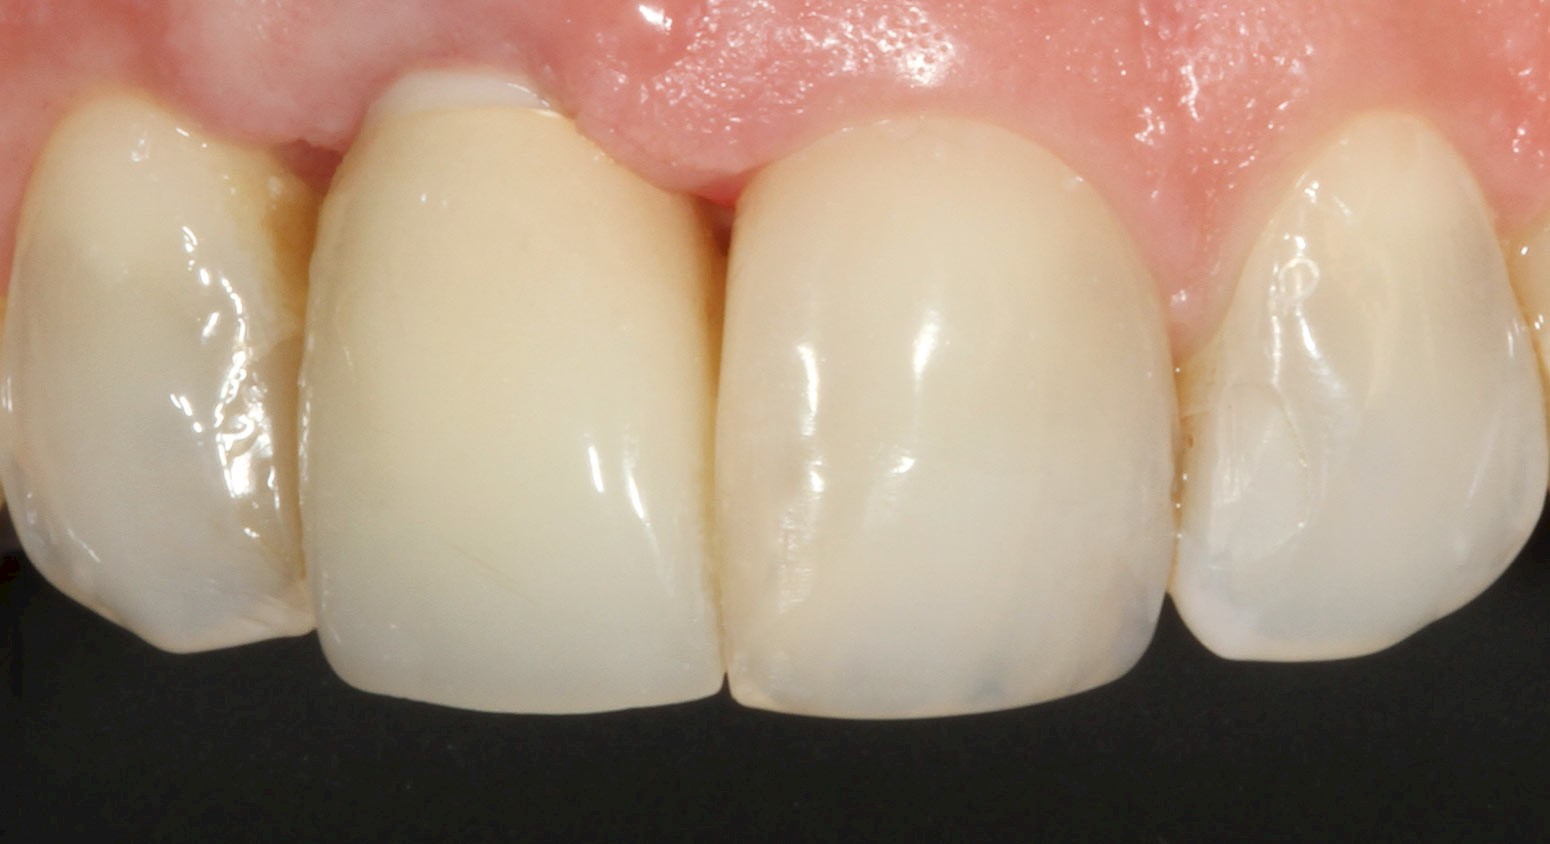
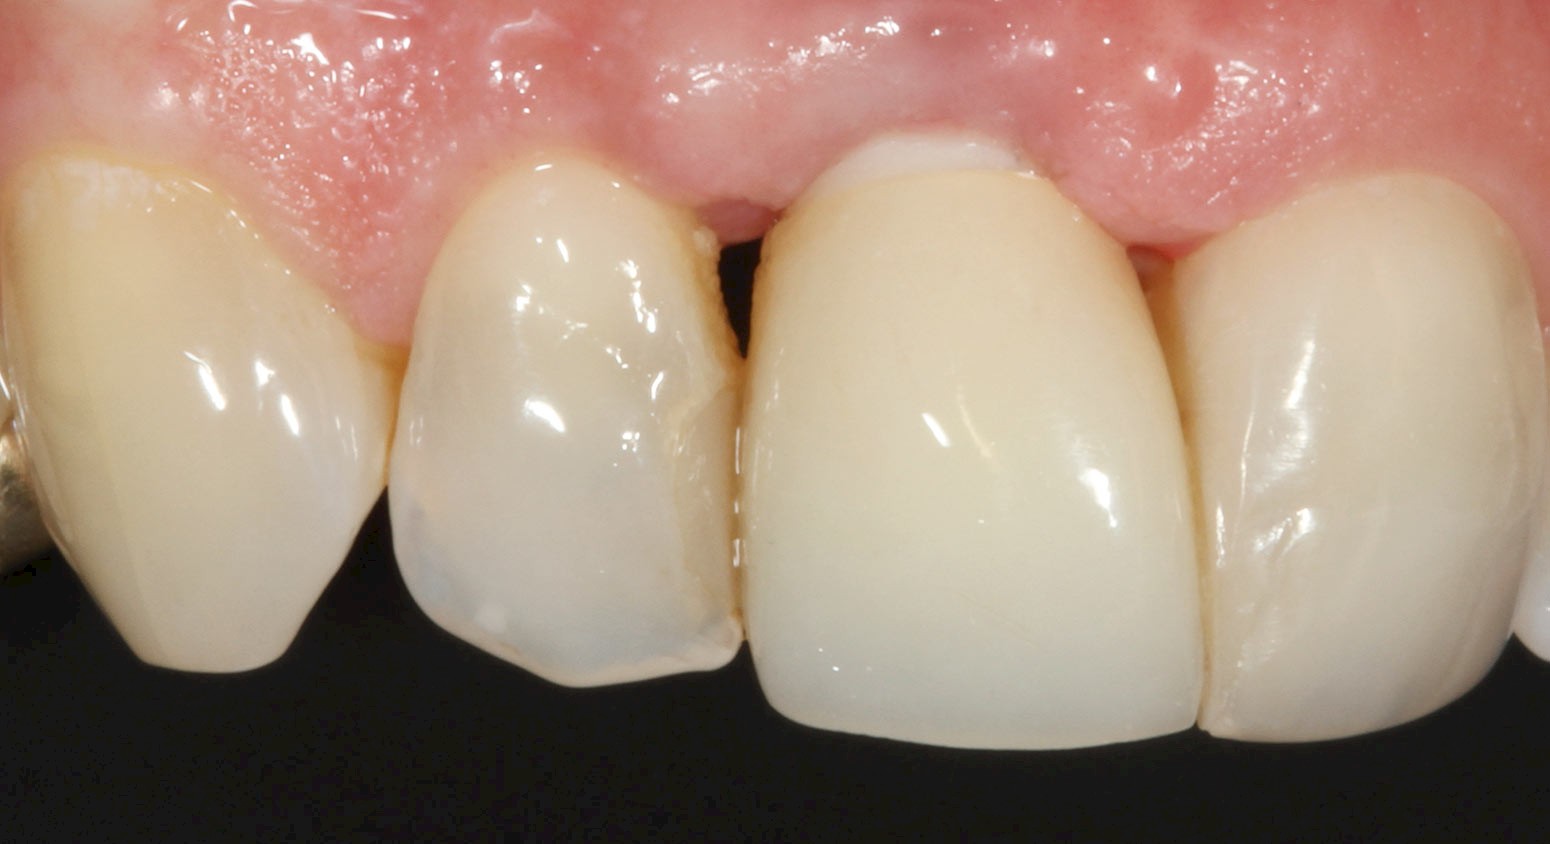
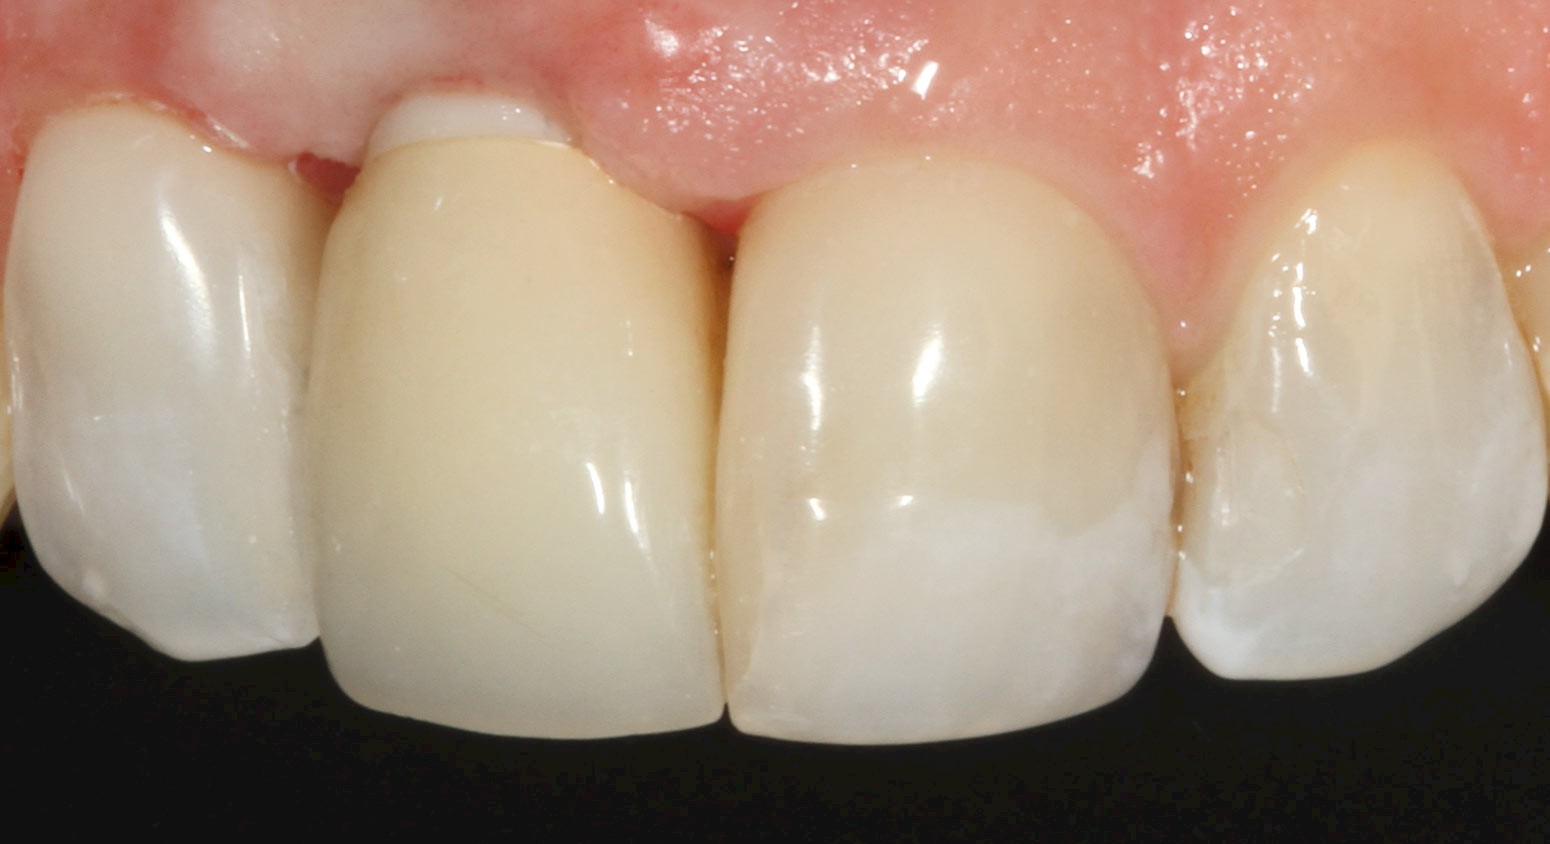
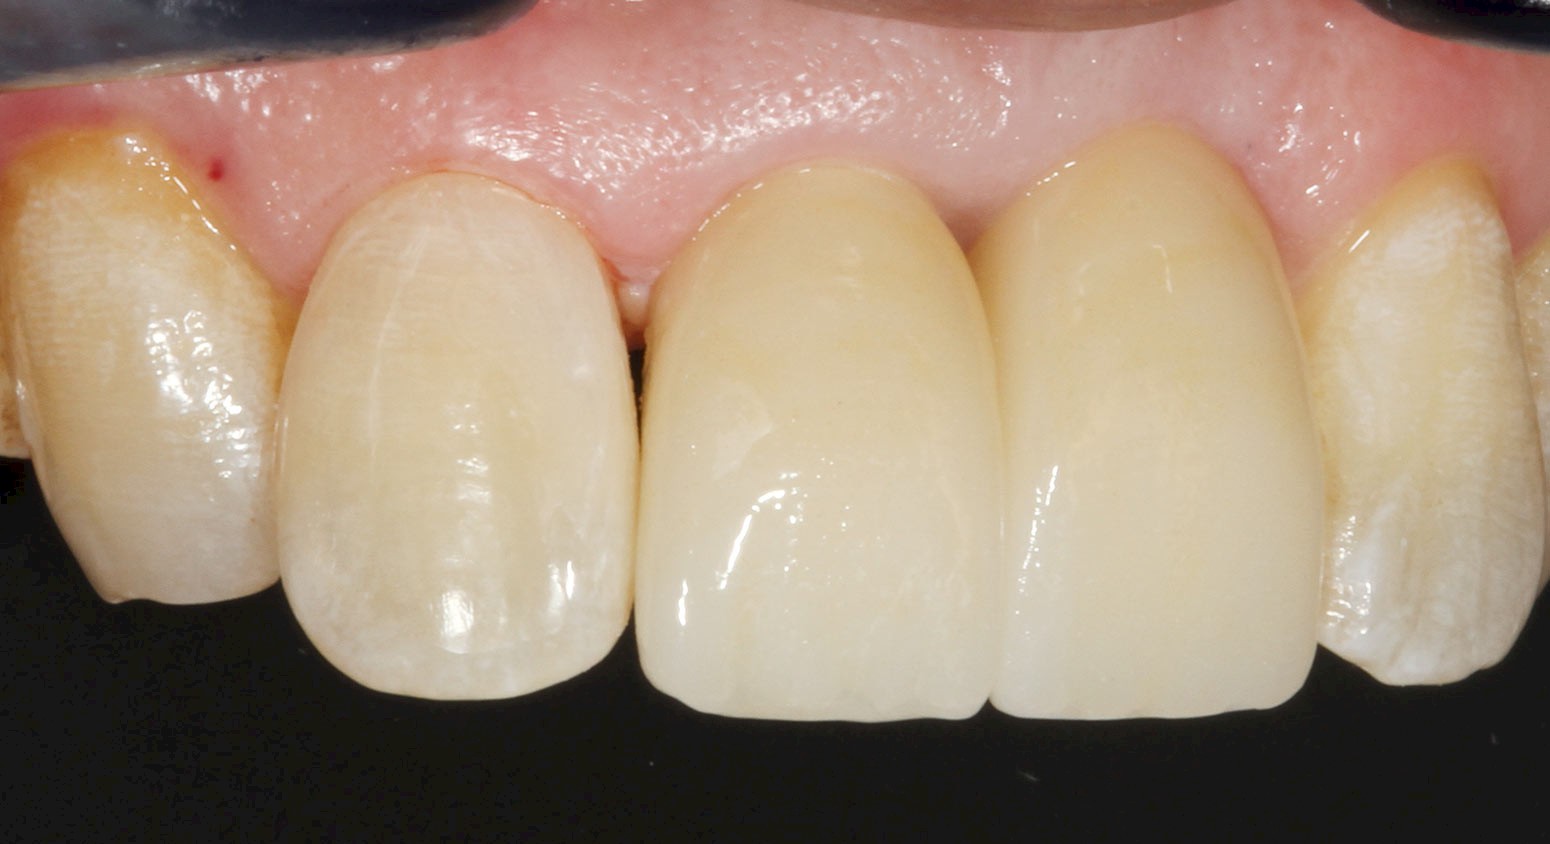
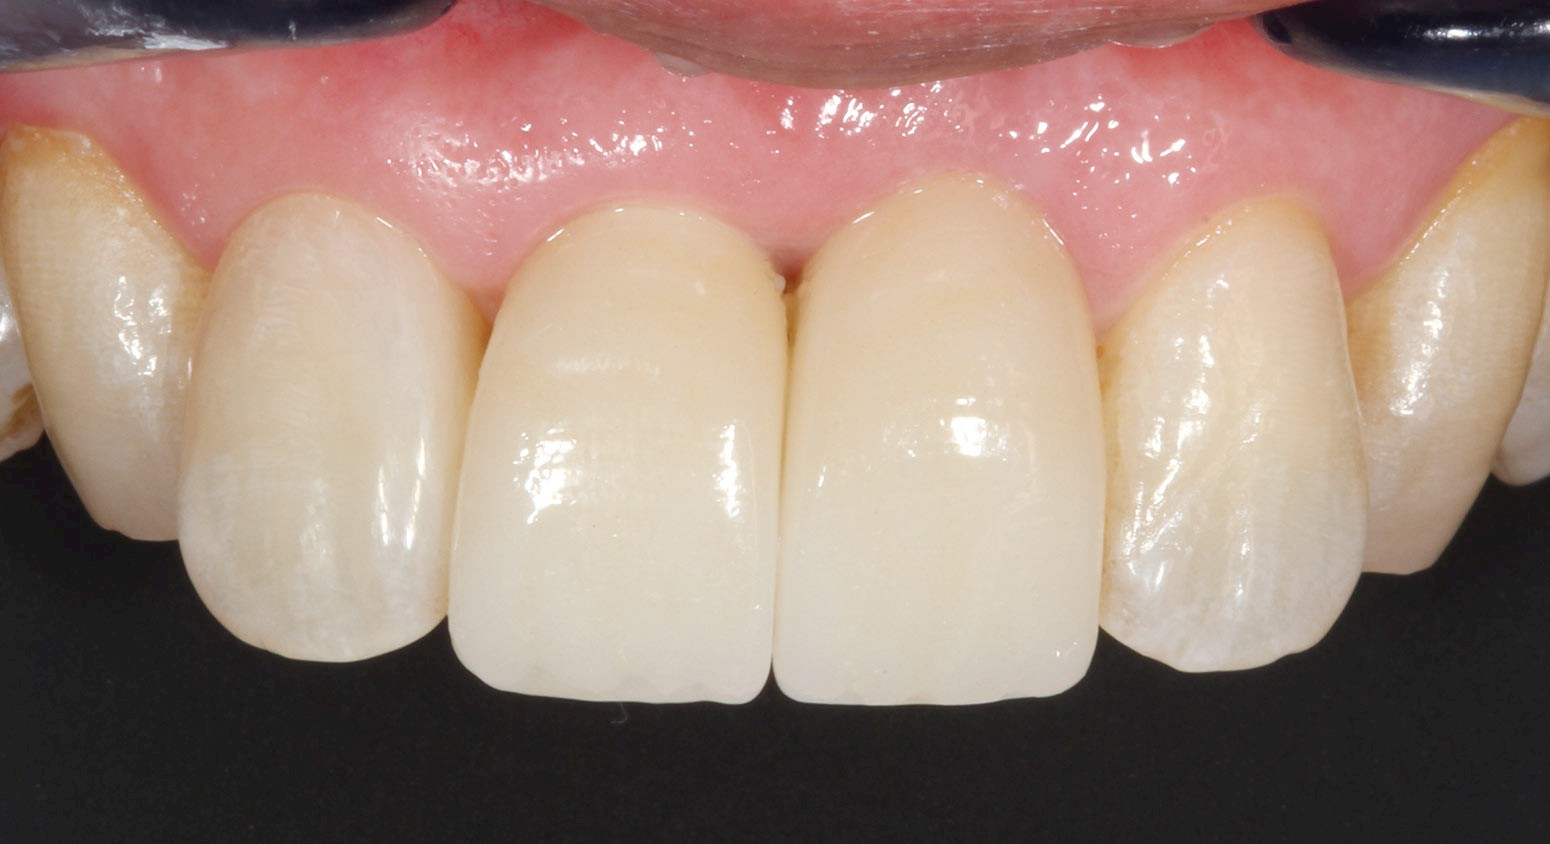
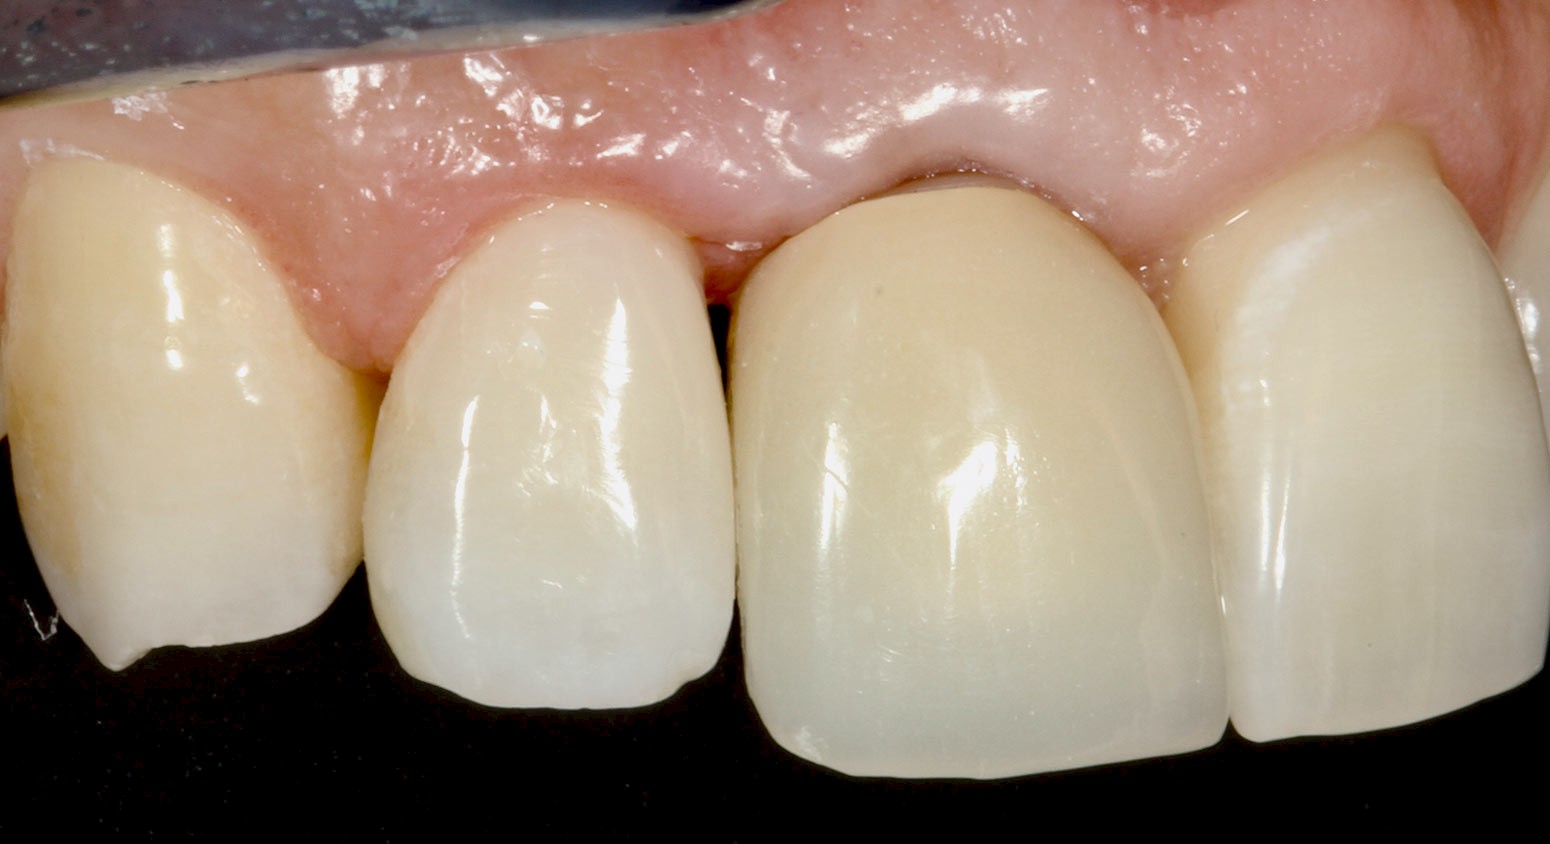
Figure 5 shows the finished (carbide finisher H48 LQ, Komet) and polished (Enhance and PoGo polisher, both Dentsply Sirona) restoration. With this additive measure, the basal contour of implant crown 21 could be adapted to the current periodontal conditions. Implant 11 still carries the PMMA long-term provisional. Following the regular procedure for implant-prosthetic restoration of anterior implants, the PMMA provisional was replaced with a definitive ceramic implant crown (veneered zirconium oxide) after 4-6 weeks after composite attachment to the adjacent tooth. Figure 6 shows the situation after one year, figures 7-9 after a total of 2 years and figure 10 three years after the basal, circular composite abutment on implant crown 21. Even though a perfect match of the colours of the two implant crowns was not achieved (the patient always focused too much on the colour match to the natural tooth 12), the treatment measure can still be seen as a success, as the composite abutment on the existing implant crown made it possible to match the shape of both anterior crowns - without asymmetry and without an overly pronounced black triangle.
The composite abutment has become somewhat duller, but a repolishing in this area would be possible at any time without any problems.


Case 2: Cervical-approximal composite abutment next to an implant crown.
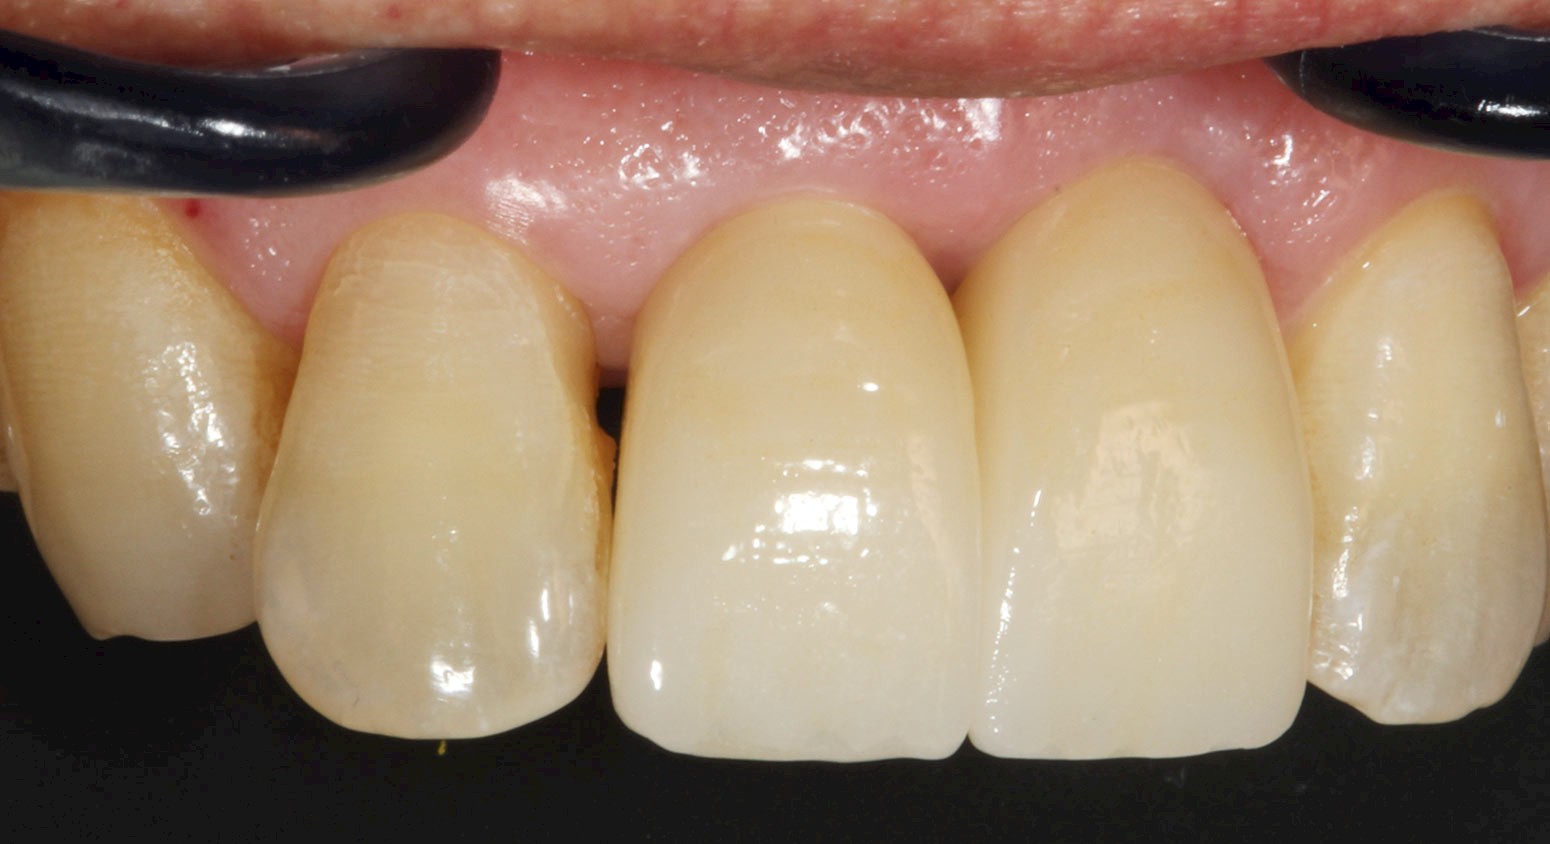
In this case, tooth 21 was also the focus of a shape correction with composite: Tooth 11 of the 55-year-old patient had been restored alio loco with an implant prosthesis. There was a clear gingival recession with exposure of the ceramic abutment. The gingival recession subsequently also affected tooth 21, which now appeared too narrow basally mesial-approximal/ cervical due to the exposed anatomical indentation at the transition to the tooth root.
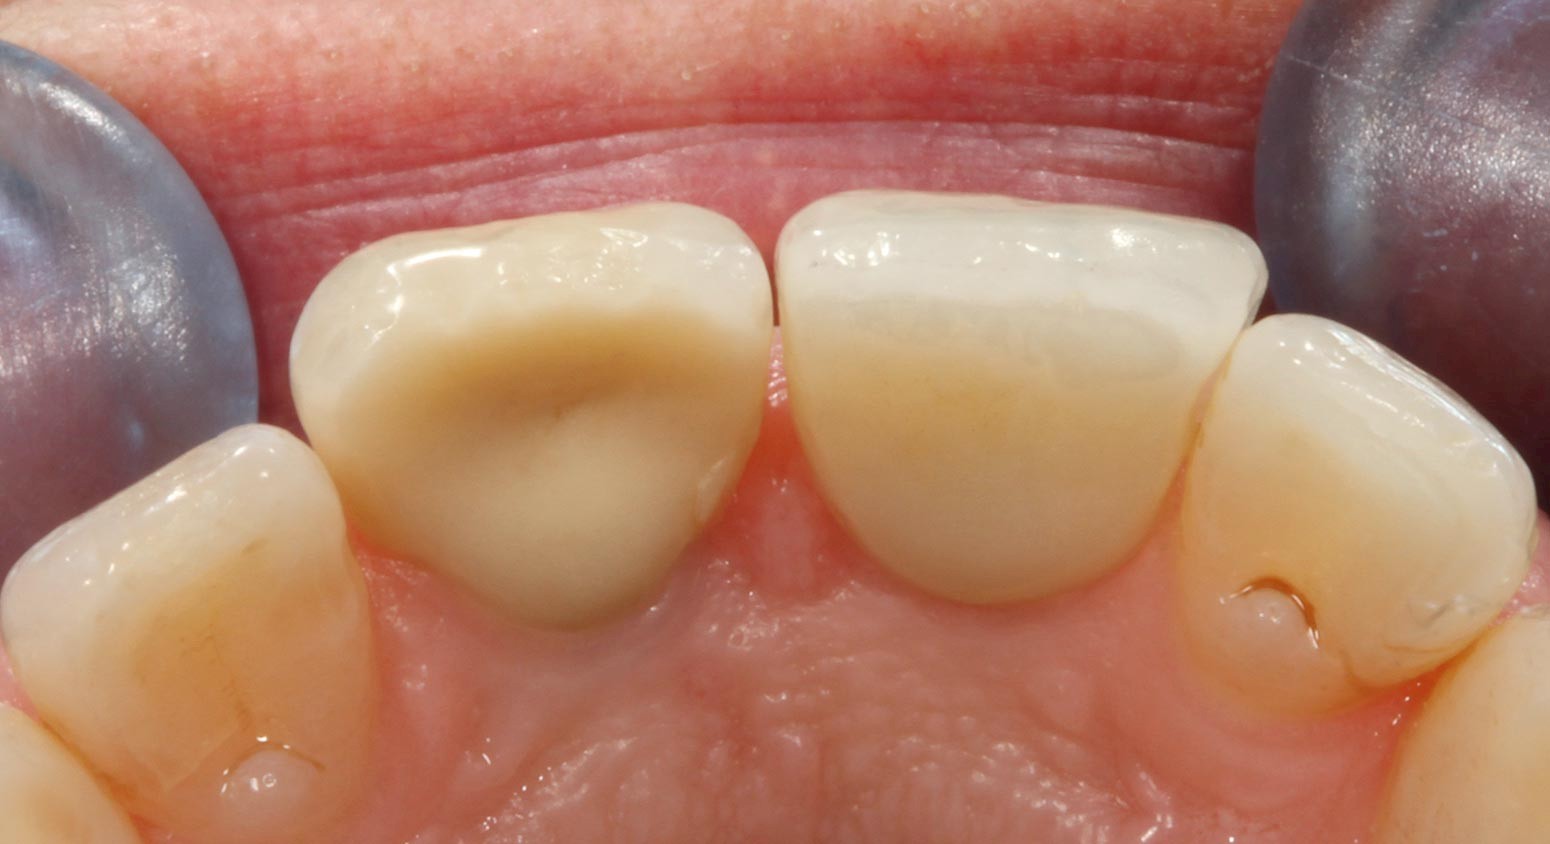
The isolation of the defect (after light roughening and freshening of the bonding surface with a red ring finishing diamond) was carried out identically to case 1 with the Unica anterior matrix (Polydentia, Fig. 11); the composite build-up with Optibond FL and OMNICHROMA. Since accessibility and visualisation were easier in this case than in case 1, the additional use of a flowable could be dispensed with here. Only OMNICHROMA (Tokuyama) [17, 22] was used as the filling material. If the additional use of a flowable were desired, OMNICHROMA FLOW would certainly be a useful addition [22].
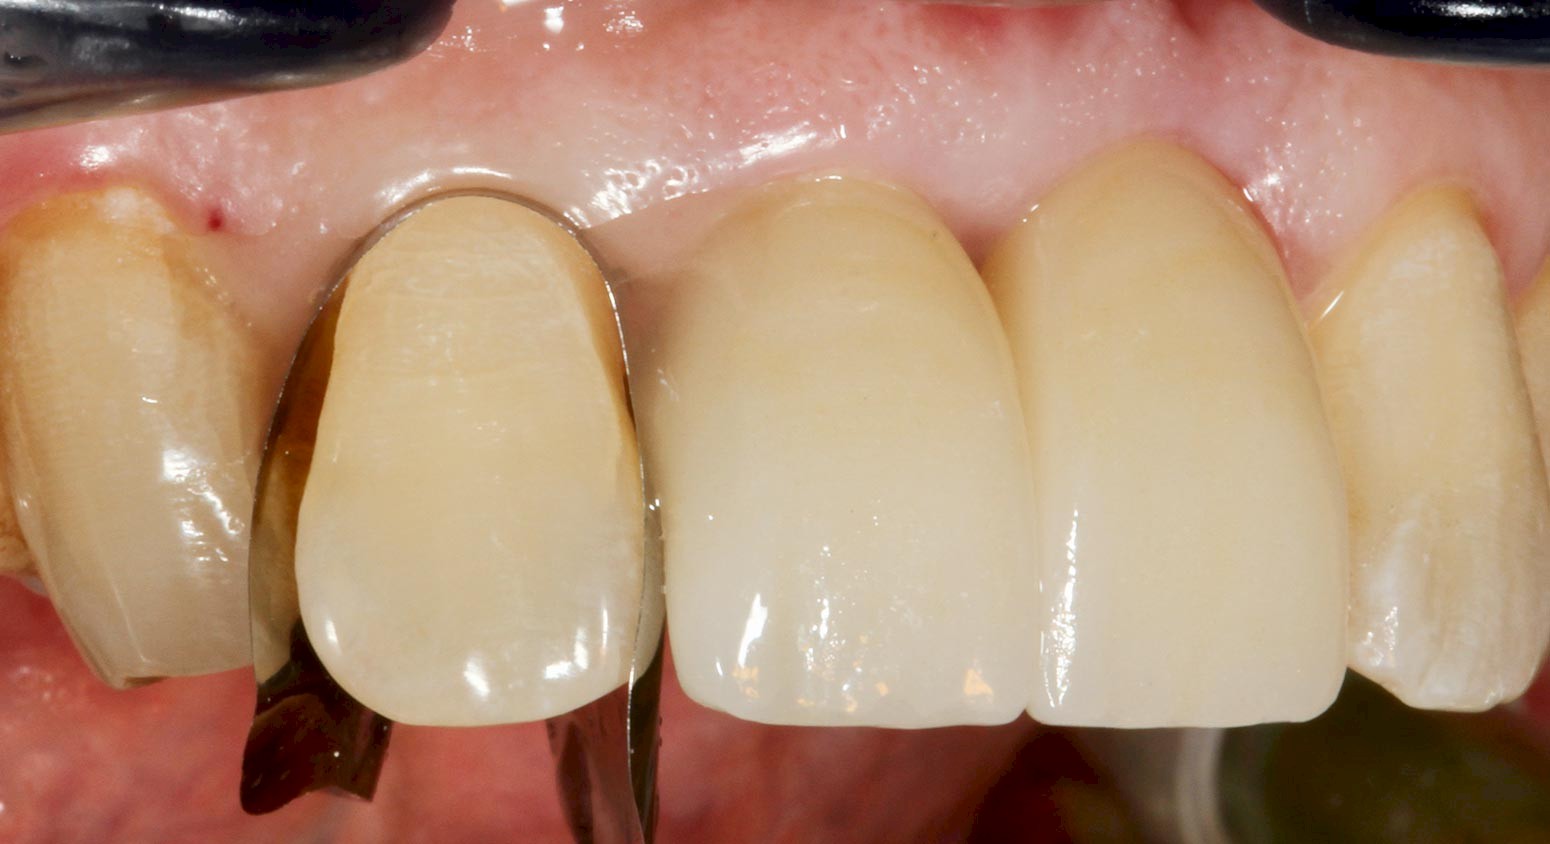
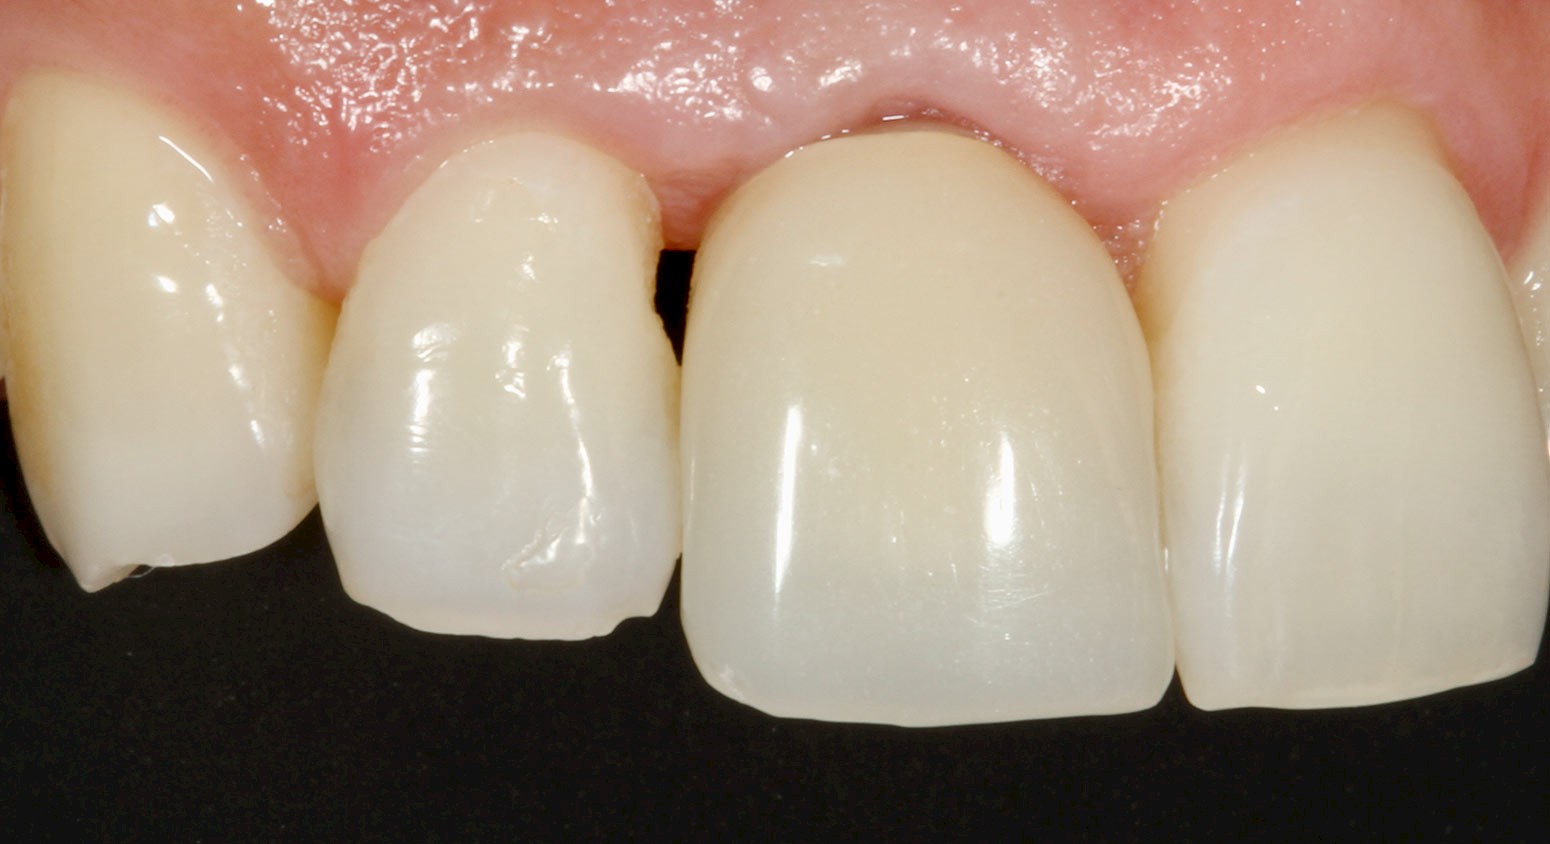
The additional use of the OMNICHROMA BLOCKER (Tokuyama) was not necessary here. Figure 12 shows the clinical situation immediately after finishing and polishing; figure 13 after exactly one year. Healthy gingival conditions and a stop to recession are evident. The replacement of the implant crown on tooth 11 is not an option for the patient at the moment for cost reasons. However, the patient wanted a correction of the mesial surface of tooth 12 (Fig. 14). This was done in an identical approach to tooth 21 with the same materials. Figures 15 and 16 show the finished restoration. The severe drying of the tooth structure of teeth 13, 12 and 21 immediately after completion of the treatment is impressive.

Case 3: Proximal-cervical attachment to the lateral incisor adjacent to an implant tooth.
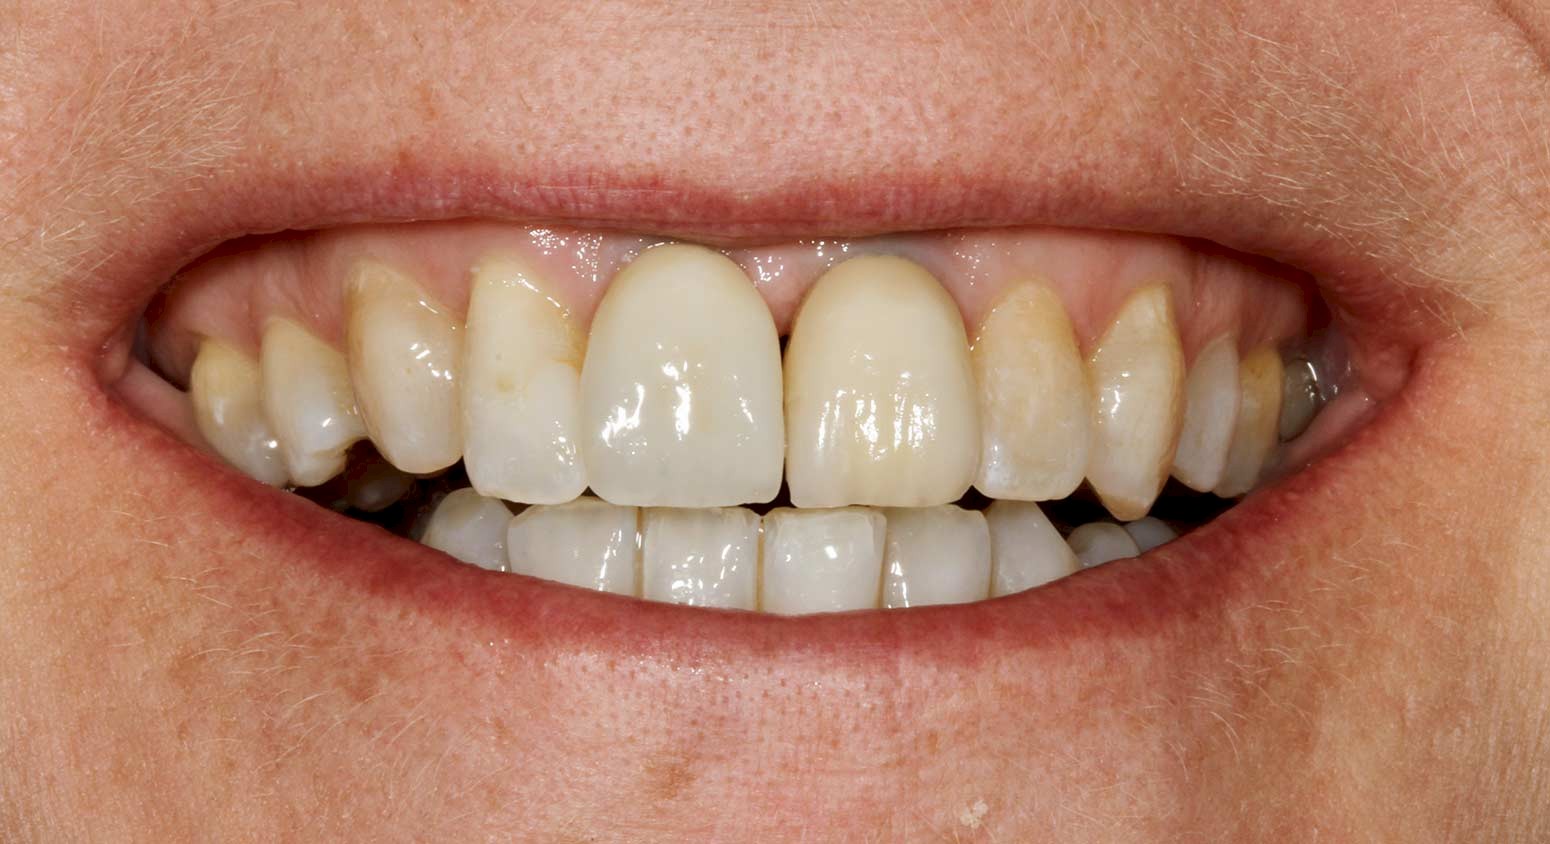
The 63-year-old patient wanted the black triangle between teeth 12 and 11 to be reduced. Teeth 11 and 21 are restored with implants (Fig. 17).
Here, too, the only preparation was roughening of the adhesive surface with an EVA file (intensive). The Unica matrix was again used for shaping (Fig. 18).
The restoration itself was made with OMNICHROMA FLOW and OMNICHROMA , and Optibond FL was again used as the adhesive. Figure 19 shows the restoration that has just been finished and polished (H48 LQ -carbide finisher, Enhance and PoGo polisher). There is still a small cervical composite excess mesially, but this was removed afterwards. Figures 20 and 21 show the same situation after one year: The excess composite has been removed, the gingival conditions are healthy and the black triangle has been significantly reduced to the patient’s complete satisfaction.

Case 4: Proximal-cervical attachment to a lateral incisor next to an long-term temporary on an implant.
The 38-year-old patient required an implant prosthetic restoration at this site following the accidental loss of tooth 11. For the final shaping of the gingiva, a PMMA long-term temporary was initially placed as in case 1; the definitive crown restoration with a veneered zirconium oxide crown was not placed until 4-6 weeks later. This gives stable long-term results with red aesthetics on implants.
During this shaping phase, the defect and mesial retraction on tooth 12 adjacent to the implant crown was noticeable (Fig. 22). Again, the patient was advised towards a small additive composite build-up.
The implementation was equivalent to the three cases described in advance. Figure 23 shows the Unica matrix fixed with Clip Flow. For a change, Filtek Universal in shade A1 was used as the restoration material. Clearfil Majesty ES Flow low in shade A1 was used as the flowable in the snow plough technique this time. The adhesive was again Optibond FL. Figure 24 shows the finished restoration immediately after finishing and polishing.
Conclusion:
Small, minimally invasive composite abutments can significantly improve the shape of an incisor. This is often essential, especially next to implant crowns, as it is not uncommon for significant gingival recession to occur on the neighbouring teeth in the course of tooth loss, leaving them „exposed“.
The visual deficit for the patient then often manifests itself in more or less pronounced black triangles. A veneer restoration at the same time as the definitive crown restoration of the implant tooth may be considered as a treatment alternative. However, this restoration alternative represents a significantly more costly option whose functional added value only justifies the additional costs to a limited extent. Therefore, direct composite abutments are the most efficient and at the same time an aesthetic restoration alternative. The abutments were billed as F3-MKV restorations with an increase rate adapted to the effort involved.
With regard to the material selection of the restorations, it remains the personal preference of the individual practitioner which adhesive, which flowable and which composite he/she uses. Cross-manufacturer material selection is also not a problem [35].
It is interesting to note that in the given indications, the OMNICHROMA universal shade produces identically beautiful results as the individual shades of established and well-known shade systems, such as the Ceram.X Spectra ST in shade A3 presented in case 1 and from case 4 with shade A1 of the Filtek Universal portfolio. In the indications presented, dispensing with the necessary colour determination is a significant advantage that saves time and provides application security.
Literature list upon request.

Author:
Prof. Dr Claus-Peter Ernst
Professor, Polyclinic for dental conservation, University Medicine of the Johannes Gutenberg-University Mainz
Dental clinic medi+
Haifa-Allee 20
DE-55128 Mainz
Germany
Phone: +49 6131 4908080
ernst@mediplusmainz.de
https://mediplusmainz.de